Game Hacking #1: Developing Hacks for idTech3 Based Games
August 28, 2018
c++ binary hooking reverse-engineering gamehackingThe idTech3 game engine is most known for being used in games like Quake III Arena, Wolfenstein: ET and Star Wars: Jedi Knight - Jedi Academy. Sometimes people just simply refer to this engine as the Quake3 engine. This post teaches you how to create hacks for games that are based on this game engine. The target of choice is the game Jedi Academy, which was released in 2003. Oldschool, I know - but most of the injection and hooking techniques can also be applied to modern games.
My plan was to implement the following features:
- Wallhack: Seeing enemies through walls
- Aimbot: Automatically aim at enemies and selected targets
- Triggerbot: Automatically pull the trigger and shoot at enemies once they are present in the crosshair
- Anti Grip: Enemies are able to choke our local player, so this feature tries to prevent that. It detects if an enemy is force gripping the local player and automatically breaks the force grip by aiming at the enemy and applying a force push.
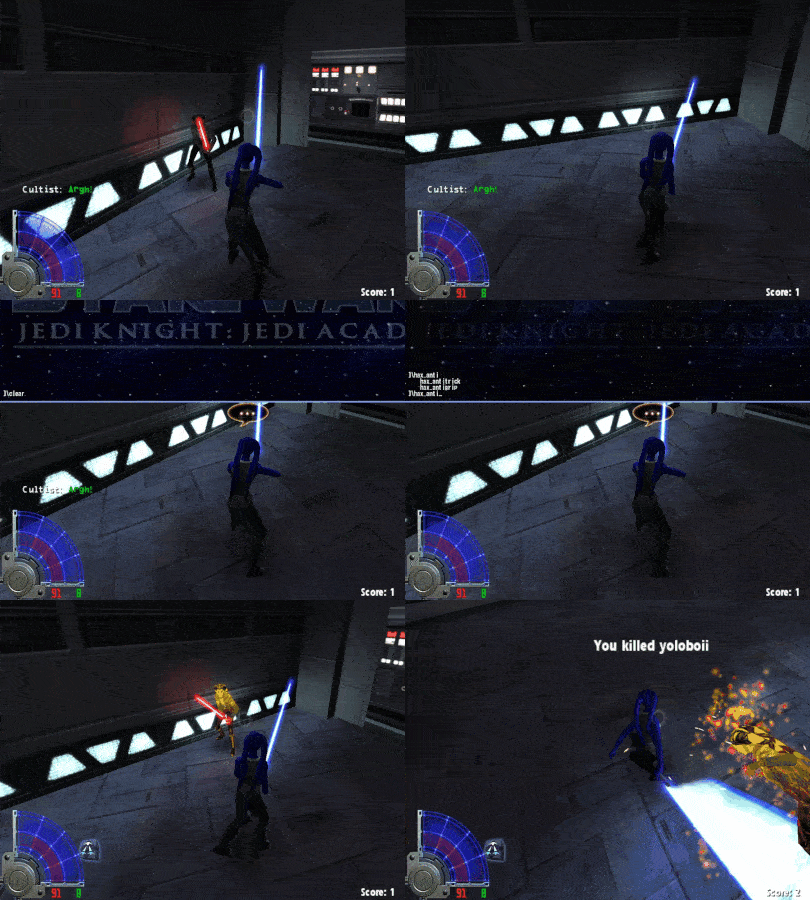
- Anti Mind Trick: There’s a force power in the game that mind tricks other players, so they’re not able to see the attacker for a period of time. We want to disable this for our local player and see the enemy anyways :)
- Player Glow: Enemies are glowing for better visibility
- CVar Unlocker: Use blocked client side settings
I’ve released the public part my source code here in case you want to take a look.
The Game Engine
Before creating a game hack, it’s important to understand some key aspects of the underlying game engine. For idTech3, there’s a great architecture review available here. What’s particularly interesting for cheat development is that the engine separates tasks into individual virtual machines. These are called QVMs in the idTech3 world. QVMs contain bytecode, which makes them portable.
On the client side, there are the cgame and ui virtual machines that may receive messages from the engine: quake3.exe or in our case jamp.exe for the Jedi Academy multiplayer executable:
The cgame QVM is responsible for predicting player states and telling the sound and graphic renderers what to do. For our purposes, this is the most interesting VM to hook and manipulate at runtime.
Each QVM exports a vmMain() and a dllEntry() function:
$ r2 -A cgamex86.dll
[0x3006fb45]> iE
[Exports]

nth paddr       vaddr      bind   type size lib          name
―――――――――――――――――――――――――――――――――――――――――――――――――――――――――――――
0    0x0005a8e0 0x3005a8e0 GLOBAL FUNC 0    cgamex86.dll dllEntry
1    0x0003f690 0x3003f690 GLOBAL FUNC 0    cgamex86.dll vmMain
The vmMain() function acts as a dispatcher which forwards the requested calls and parameters from the main executable to the internal QVM bytecode functions. This function accepts these parameters:
- An
intparameter calledcommand. There’s a hugeswitchstatement invmMain()which has acaseblock for each possible command - Twelve additional
intparameters. These are parameters for the requested QVM command
The QVM can also call back into the main executable jamp.exe using a system call function pointer. Please note that the term system call is game engine and QVM specific and not related to OS syscalls. This function pointer gets passed to the QVM using the exported dllEntry() function. It’s usually implemented as follows:
Q_EXPORT void dllEntry( intptr_t (QDECL *syscallptr)( intptr_t arg,... ) ) {
    Q_syscall = syscallptr;

    TranslateSyscalls();
}
The syscallptr is being used to implement a call-back mechanism: The QVM can use this function pointer to execute functions implemented in the main executable.
Hooking Functions
In order to set up the required hooks, the plan is as follows:
- Hook the
GetProcAddress()function of the game process. This function is being used to retrieve addresses from DLL exports. It’s being called as soon as the game starts. Using this hook we can replace calls tovmMain()anddllEntry()with our own implementations. - Our
vmMain()function checks which system call is being used and either manipulates the execution or just forwards the call to the original function - By replacing
dllEntrywith our own function, we are able to steal the passedsyscallptrvalue, which is a function pointer to the game executable’s system call interface. Using this function pointer, it’s then possible to implement our own version of this function. Based on the requested system call, modifications can then be applied dynamically. Also, it’s possible to just execute system calls ourselves.
Let’s discuss how these manipulations can be applied at runtime.
Hookless Hacks
Before talking about API hooks, let’s quickly check out a way to alter a remote process by directly patching functions in memory. This has already been covered in one of my previous posts. The basic approach is the identify function and memory addresses of interesting data and code and to modify it by spawning a thread in the target process or by overwriting them directly from another process. A good example of this approach can be found here.
This approach might look easy and elegant. However, finding the correct offsets and memory addresses can be tedious. Also, after game updates these values don’t match anymore. Because of this, it may be easier to use hooking to alter a given process.
API Hooking
There are easy-to-use API hooking libraries available, like mhook. The usage of this particular library will also be discussed in this post.
DLL Injection
In order to hook functions of a given process, it’s necessary to install the hook from the context of the target application. This can be accomplished with a technique called DLL injection. This involves loading a custom DLL into the target process and spawning a designated thread for it. There are many approaches to do this – this post covers the LoadLibraryA() method.
Note: I’m building the DLL loader and the DLL itself using Visual Studio. To simplify things, I’ve disabled unicode and the usage of pre-compiled headers in VisualStudio or things will get ugly. Also, I made sure to set the target architecture according to the target process – in this case it’s x86.
Building The DLL Loader
The DLL loader has to take care of these things:
- Execute the game binary
- Get a handle of the game process
- Locate the DLL to be injected
- Load the DLL in the context of the game process
- Start a remote thread for the DLL
Take a look at this simplified loader code snippet:
// Get the address of LoadLibraryA in kernel32.dll, used to
// pass it to the remote process in order to load our dll later on
LPVOID loadFunctionAddress = (LPVOID)GetProcAddress(GetModuleHandle("kernel32.dll"), "LoadLibraryA");

// Allocate space in the target process for our DLL **PATH**
LPVOID allocatedMem = LPVOID(VirtualAllocEx(procHandle, nullptr, MAX_PATH, MEM_RESERVE | MEM_COMMIT, PAGE_READWRITE));

// Write the **PATH** of our DLL in the allocated memory of the remote process
WriteProcessMemory(procHandle, allocatedMem, dllPath, MAX_PATH, nullptr);

// Load the DLL by causing the remote process to spawn a thread which calls LoadLibraryA
// which loads the DLL using the path we allocated previously.
HANDLE threadHandle = CreateRemoteThread(procHandle, nullptr, NULL, LPTHREAD_START_ROUTINE(loadFunctionAddress), allocatedMem, NULL, nullptr);
Please note that error handling has been removed for a better overview. The full loader source code can be found here.
As soon as the DLL is injected into the target process, the DLL’s DllMain() function will be executed. Now, let’s build a simple DLL to test the injection process.
DLL Structure
The starting point for this is a new DLL project created by VisualStudio. After creating the project, the file dllmain.cpp should have already been created. Let’s create a simple PoC that spawns a message box upon loading the DLL:
BOOL APIENTRY DllMain
(
	HMODULE hModule,
	DWORD  ul_reason_for_call,
	LPVOID lpReserved
)
{
    switch (ul_reason_for_call)
    {
		case DLL_PROCESS_ATTACH:
			MessageBox(0, "Injected!", "DLL", 0);
        break;
    }
    return TRUE;
}
Compile this DLL, pass it to the loader and check out the created message box.
Accessing Engine Data Structures
At this point, it’s possible to execute code in the context of the target process. However, we still need access to the games internal engine data structures in order to actually implement the hack. These data structures contain all kinds of information on the environment, players and objects in the game. By hooking the right QVM system calls, the values of these structures can be obtained in the context of the injected DLL. Two steps are required for this:
- Add the official SDK to the Visual Studio project. There are some useful header files that include the definitions for the data structures we are looking for.
- Hook some QVM system calls.
Let’s add the hook for GetProcAddress() to the DLL’s main function:
if (!Mhook_SetHook((PVOID *)&originalGetProcAddress, hookGetProcAddress)) {
    MessageBox(0, "Couldn't create hook", ":(", 0);
}
Below is our own version of GetProcAddress():
FARPROC WINAPI hookGetProcAddress(HMODULE hModule, LPCSTR lpProcName) {
    CHAR moduleName[MAX_PATH];

    // check in which dll the call will be executed
    if (!GetModuleFileName(hModule, moduleName, sizeof(moduleName))) {
        return (FARPROC)originalGetProcAddress(hModule, lpProcName);
    }

    // are we in the game vm?
    if (isSubstr(moduleName, "cgamex86.dll")) {

        if (isSubstr(lpProcName, "dllEntry")) {
            // Modify returned function here
            // --> execute modified function instead
            // (modified function calls original function after doing hax using `originalDLLEntry`)
            originalDLLEntry = (DLLENTRY)originalGetProcAddress(hModule, lpProcName);
            return (PROC)hookDLLEntry;
        }

        // Save things as above, only for vmMain
        if (isSubstr(lpProcName, "vmMain")) {
            originalVMMain = (VMMain)originalGetProcAddress(hModule, lpProcName);
            return (PROC)hookVMMain;
        }

    }
    return (FARPROC)originalGetProcAddress(hModule, lpProcName);
}
As soon as the main game executable tries to resolve the address for dllEntry() or vmMain() inside of the cgame QVM, the hook returns the address of our own version of one of these functions. Of course, our implementations need to accept the same parameters values or otherwise execution may fail and we’re not able to call the original function too.
Here’s an example for dllEntry() that steals the passed syscall function pointer and uses our own syscall function instead:
// Type used to hook QVM system calls
int(QDECL* syscall)(int arg, ...) = (int(QDECL*)(int, ...)) - 1;

// this will be called instead of the original `dllEntry`
// the result type and parameters result from the original
// engine code
void hookDLLEntry(int(QDECL* syscallptr)(int arg, ...)) {
    syscall = syscallptr;
    originalDLLEntry(syscall_hook);
}

// This is now being called for every QVM syscall
// We can steal parameters or modify them, based on the requested syscall / `cmd` value
int syscall_hook(int cmd, ...) {

    // this is a variadic function, so this gets all parameters
    // using va_arg
    int arg[14];
    va_list arglist;
    int count;
    va_start(arglist, cmd);
    for (count = 0; count < 14; count++)
    {
        arg[count] = va_arg(arglist, int);
    }
    va_end(arglist);

    // check which syscall has been requested
    switch (cmd)
    {

    // Gets information on an entity
    case CG_GETDEFAULTSTATE:
    {
        centity_t* cur = (centity_t*)arg[1];
        pEntities[arg[0]] = cur;

        // if it's our local player entity, save the pointer
        if (ps && cur->currentState.clientNum == ps->clientNum) {
            pPlayerEnt = cur;
        }
        break;
    }

    // the VM processed the current game state
    // --> steal the parameters
    case CG_GETGAMESTATE:
    {
        gameState = (gameState_t*)arg[0];
        // the gameState_t* element is wrapped by a cgs_t struct, so
        // using pointer arithmetic it's possible to get the "parent" element
        // --> the cgs_t struct
        cgs_t* _tmp = 0;
        client_gameState = (cgs_t*)((int)gameState - (int)&_tmp->gameState);
        break;
    }

    // get own playerstate
    case CG_GETSNAPSHOT:
    {
        // call the real syscall first so the struct will be prepared for the following calls
        auto result = syscall(cmd, arg[0], arg[1], arg[2], arg[3], arg[4], arg[5], arg[6], arg[7], arg[8], arg[9], arg[10], arg[11], arg[12], arg[13]);

        snapshot_t* snap = (snapshot_t*)arg[1];
        // get the current player state
        ps = &(snap->ps);

        cg_t* tmp = 0;
        // we have an `activeSnapshots` object, so let's subtract its length and get the parent element
        client_game = (cg_t*)((int)arg[1] - (int)&tmp->activeSnapshots);

        return result;
        break;
    }

    default:
        break;
    }

    // execute the original syscall using the passed parameters
    return syscall(cmd, arg[0], arg[1], arg[2], arg[3], arg[4], arg[5], arg[6], arg[7], arg[8], arg[9], arg[10], arg[11], arg[12], arg[13]);
}
As can be seen, our replacement function for the syscall function pointer executes the original function at the very end, so execution can proceed after our hackery has been done. Some interesting commands like CG_GETDEFAULTSTATE, CG_GETGAMESTATE and CG_GETSNAPSHOT are now under our control. The definitions of these can be found in the original Quake III Arena source code or the Jedi Academy SDK. They all get executed as soon as a client joins a game and they receive interesting data structures as parameters. As seen in the listing above, the CG_GETDEFAULTSTATE call receives a parameter of type centity_t. In the idTech3 engine, this is a pointer to an entity in memory. Among other things, this can be a pointer to a model for a player, an item or a weapon. It’s important to note that the coordinates of an entity are also stored in the centity_t structure. By having access to this data, all players and all player coordinates are now known and ready to be used by the injected DLL.
While observing the required data and available syscalls, it became clear that not all game structures will be accessible by just hooking calls and saving their parameter values. Check out a struct like this one that contains this data:
typedef struct {
    [...]
    snapshot_t* snap;
    [...]
} cg_t;
By hooking CG_GETSNAPSHOT it’s possible get the current game snapshot – a snapshot_t pointer value. We are not able to directly get a cg_t engine struct by hooking system calls but we know that the snapshot_t pointer is nested in a cg_t struct. By using some pointer arithmetic and an offset it’s still possible to get the parent struct, a cg_t value in this case:
snapshot_t* snap = (snapshot_t*)arg[1];
cg_t* tmp = 0;
// we have an `activeSnapshots` object, so let's subtract its offset in `cg_t` and get the parent element
client_game = (cg_t*)((int)arg[1] - (int)&tmp->activeSnapshots);
Cool.
Another handy thing is being able to execute code every frame. For example, it’s required for the triggerbot to check if the local player is looking at an enemy in the current frame. Also, the aimbot needs to focus on the current target in each frame. The game engine implements a system call named CG_DRAW_ACTIVE_FRAME which can be hooked by us to perform these tasks.
Time to implement some hax.
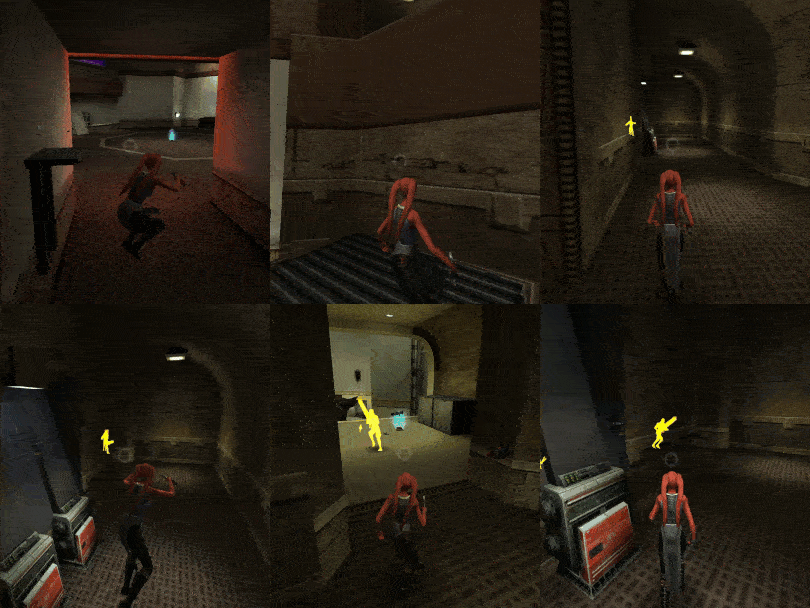
Wallhack
In case of the idTech3 engine, this can be implemented without too much effort. The CG_R_ADDREFENTITYTOSCENE QVM system call adds an entity (e.g. a player) to the scene which is about to be rendered and shown on the screen. The parameter for this is call a pointer to an entity of type refEntity_t. By adding one specific rendering flag for a given entity, it can be shown regardless of any walls between our local player and the entity. The flag is called RF_DEPTHHACK which makes the engine ignore an entity’s depth information. Entities will therefore be displayed on top of walls. Here’s the code which has to be added to our syscall_hook() function:
[...]
case CG_R_ADDREFENTITYTOSCENE:
{
    // get the passed entity parameter
    refEntity_t *ref = (refEntity_t *)arg[0];

    // add the RF_DEPTHHACK flag to display the entity
    // over walls, effectively disabling depth for players
    ref->renderfx |= RF_DEPTHHACK;

    if (playerGlowRequired()) {
        // add a glowing shader for a better view
        ref->customShader = client_gameState->media.disruptorShader;
    }

    break;
}
[...]
As you can see, the player glow also gets added in this segment. Calling playerGlowRequired() checks if an entity is a player by making use of other engine structures, namely centity_t pointers which have also been saved by hooking Q3 system calls. This also checks if a given entity belongs to an enemy or to a team mate and acts accordingly – no glow will be added for team mates or dead players.
Here’s the wallhack in action:
Aimbot
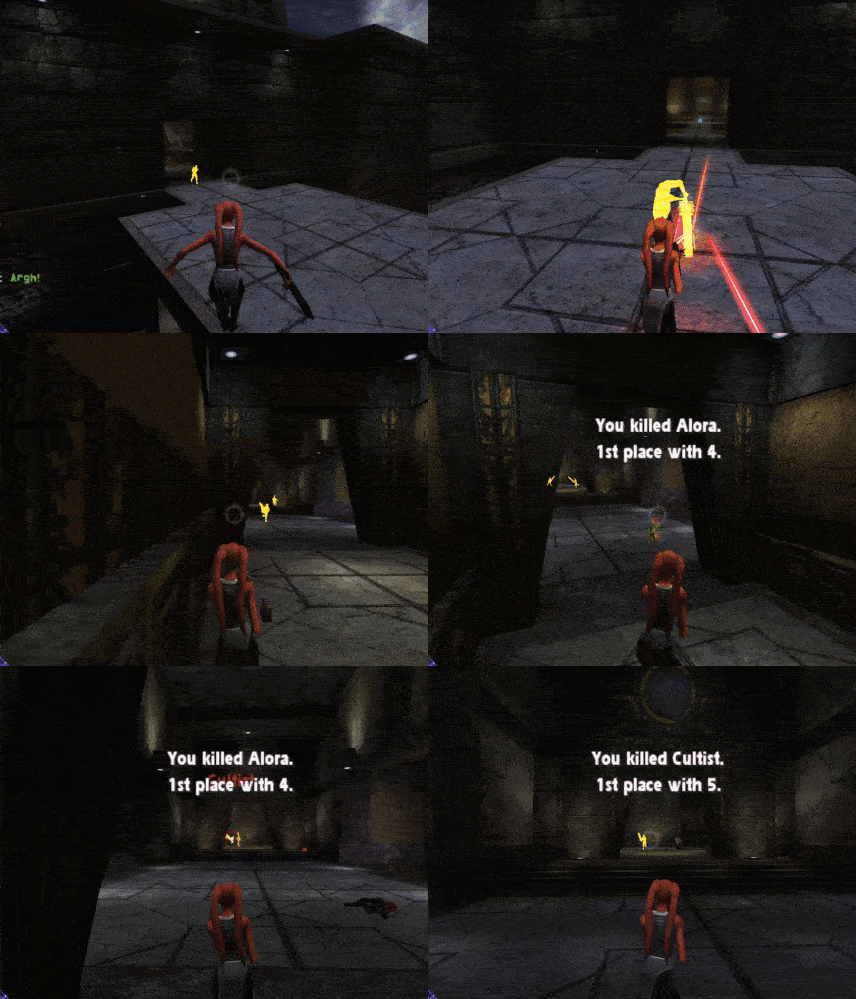
The idea is to continuously focus on an enemy entity in case the aim key, for example the left CTRL key, is being held down. As soon as an enemy is present in the crosshair, the aimbot will therefore lock the view on the respective entity on the screen.
There are various ways to implement this but generally speaking you need two things:
- A way to calculate the correct angle that’s required in order to aim at the enemy.
- A function that sets the view angle. This can happen by directly writing to memory or by sending mouse input events. Since I’ve found no reliable way to use direct memory access to set the view angle, I’m using mouse events. If you want to see an example of direct memory access, check out this blog post of mine.
Now, theres some mad math behind all the required calculations. In short, you need a world to screen function, which transforms the 3D coordinates of the game world into 2D coordinates you can actually use to make the aimbot work in combination with mouse events. Most likely your screen only has two dimensions, the game has three – hence the transformation. Also, it allows to check if an entity is present in the current field of view. The people at GuidedHacking have a very good explanation of what’s going on in detail, so I recommend checking out this article.
For the idTech3 engine, a standard world to screen function can also be found at GuidedHacking. A convenient way to integrate it into a hack is to create a wrapper for this function. Using it is pretty straight forward: Call it with the enemy entity and the refdef engine structure, which contains information on the current field of view and the game dimensions:
// a vector storing X, Y and Z coordinates
v3_t SCREEN = { 0, 0, 0 };

// wrapper for v3_t::`w2s`
bool Q3worldToScreen(centity_t* ent, refdef_t refdef) {
    // enemy chest
    v3_t chest = ent->currentState.pos.trBase;
    // enemy head
    chest.z += 30;

    // call world to screen for the chest vector
    return chest.w2s(refdef.fov_x, refdef.fov_x, refdef.width, refdef.height, refdef.viewaxis[0], refdef.viewaxis[1], refdef.viewaxis[2], refdef.vieworg, SCREEN);
}
I’ve stolen some code for this from here.
All that’s left is to send the correct mouse events using the calculated 2D values that are now present in the SCREEN vector:
void moveMouse(v3_t point) {
    if (!client_game) { return; }

    // only if game is not minimized
    if (!isJKAForeground()) { return; }

    INPUT Input = { 0 };
    Input.type = INPUT_MOUSE;
    Input.mi.dwFlags = MOUSEEVENTF_MOVE;
    Input.mi.dx = point.x - client_game->refdef.width / 2;
    Input.mi.dy = point.y - client_game->refdef.height / 2;

    SendInput(1, &Input, sizeof(INPUT));
}
Here’s a quick demo of the aimbot and the triggerbot – no mouse movement or manual firing required:
Triggerbot
Implementing a triggerbot is pretty easy once we are able to execute code upon rendering each frame. Here’s what we need:
- A way to detect if the player is currently aiming at an enemy: This can be accomplished by reading the
client_game->crosshairClientNumvalue and passing the client number to ourisEnemy()function. - The ability to trigger an attack: Since we already have a pointer to the syscall function, we can use it and trigger an attack with
CG_SENDCONSOLECOMMAND, as you can see below:
// only trigger with a shootable weapon
if (ps->weapon > WP_SABER && ps->weapon != WP_THERMAL && ps->weapon != WP_TRIP_MINE && ps->weapon != WP_DET_PACK)
{
    int crosshairClientNum = client_game->crosshairClientNum;
    if (crosshairClientNum >= 0 && crosshairClientNum <= MAX_CLIENTS)
    {
        // only shoot at enemies
        if (isEnemy(crosshairClientNum))
        {
            // attack
            syscall_hook(CG_SENDCONSOLECOMMAND, "+attack; -attack;");
        }
    }
}
And that’s it :)
Anti Grip
Ok, here’s the thing: In this game there’s a certain force power that allows you to grip enemies. Some 1337 players use it to throw other people into pits:
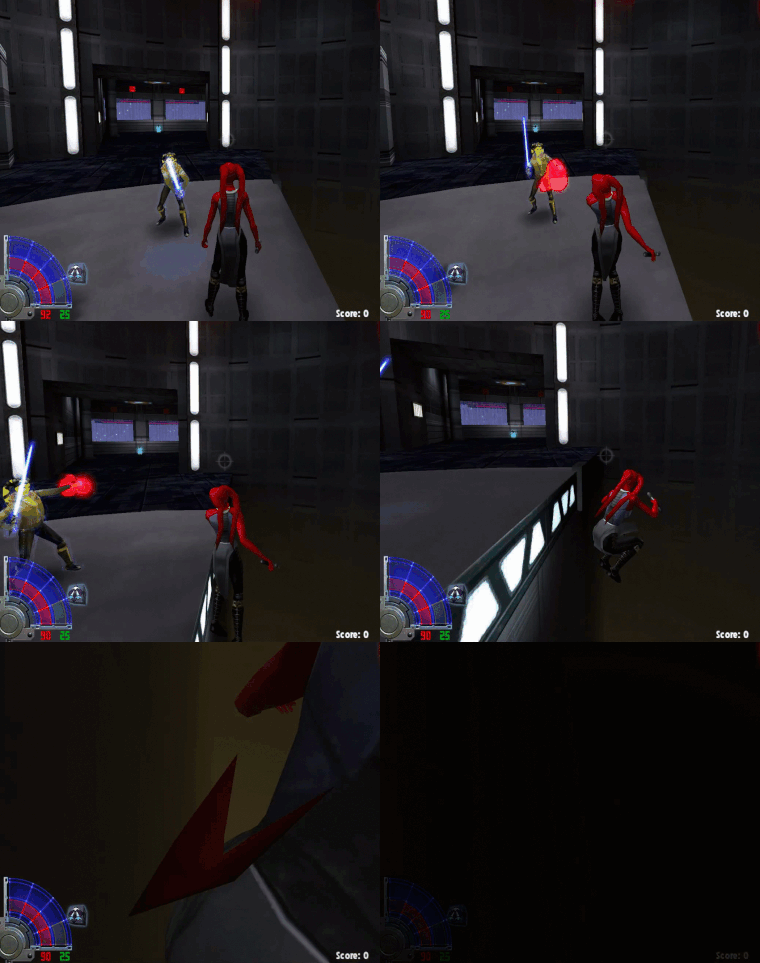
I don’t want to be treated like this and I’ve found a reliable way to prevent it. The hack needs to detect if the local players is being gripped, aim at the last attacker and perform a force push, which breaks the grip. Since the aimbot is already implemented, only a few addtional things are needed:
- Get the entity of our last attacker: Luckily, the client number of our last attacker is stored in the
persistant[PERS_ATTACKER]field of theplayerStatestructure. Every entity has a field which maps it to a specific client number, so a simple loop will determine the correct entity - Executing a force throw: This is similar to the triggerbot, the only difference is the executed command.
Here’s da code:
// If we are currently being gripped
if (ps && (ps->fd.forceGripBeingGripped || ps->fd.forceGripCripple)) {
    auto ent = entFromClientNum(ps->persistant[PERS_ATTACKER])
    // focus the current target, similar to the aimbot functionality
    focusEnt(pCurPushTarget);
    syscall_hook(CG_SENDCONSOLECOMMAND, "force_throw;");
}
And here’s the Anti Grip feature in action:
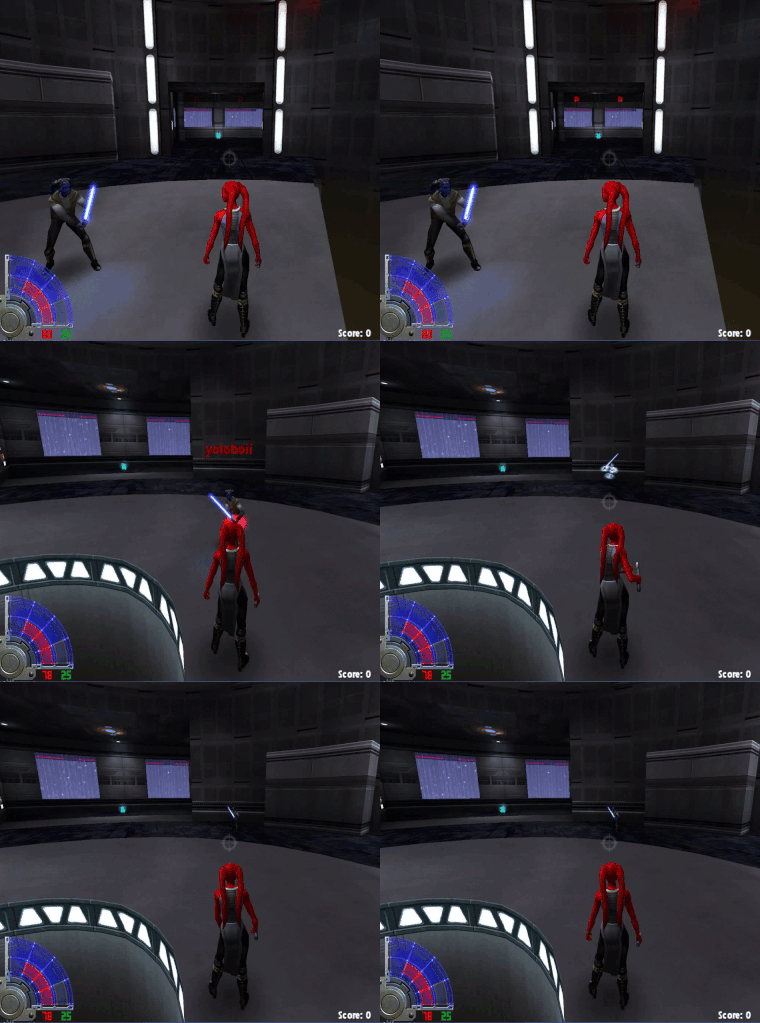
A good thing is that the force grip check can be performed quickly. Therefore executing it each frame is possible without causing any lag.
Anti Mind Trick
The old “these aren’t the droids you’re looking for” Jedi mind trick is also present in this game. It causes a player to be invisible from the perspective of the victim.
The easiest way to convince our game to show the hidden player entity nevertheless is the following: There’s another force power, force sight, which enables players to see invisible players. We just tell the game that we have already activated this force power:
ps.fd.forcePowersActive |= (1 << FP_SEE);
This works even though force powers are disabled on the server:
CVar Unlocker
Some client side settings are blocked by default, since they are classified as cheats. For example, r_fullbright 1 disables all shadows on the current map which can be an advantage in dark levels. Cheats can be blocked by making use of a server setting called sv_cheats which is read only by all clients. However, once again a manual system call can overwrite this value nevertheless:
syscall_hook(CG_CVAR_SET, "sv_cheats", "1");
Now go and check the GuidedHacking YouTube channel in case you want to learn more game haxxoring things.
Even Moar References
- mhook - A Windows API hooking library
- JKA SDK
- Q3 Source Code
- JD Hook
- Guided Hacking: OpenArena Aimbot & ESP Source Code
Further Reading
Check out the next part of my series on game hacking :)